Media Source Extensions for Audio:
Eliminating the Gap
Introduction
Media Source Extensions (MSE) provide extended buffering and playback control for the HTML5 <audio> and <video> elements. While originally developed to facilitate Dynamic Adaptive Streaming over HTTP (DASH) based video players, below we'll see how they can be used for audio; specifically for gapless playback.You've likely listened to a music album where songs flowed seamlessly across tracks; you may even be listening to one right now. Artists create these gapless playback experiences both as an artistic choice as well as an artifact of vinyl records and CDs where audio was written as one continuous stream. Unfortunately, due to the way modern audio codecs like MP3 and AAC work, this seamless aural experience is often lost today.
Note: Most MP3 encoders (including LAME as used in this example) do not produce sufficient pre-roll and post-roll for a flawless transition between segments. If you need a truly flawless transition, we recommend using AAC with the default paddings of 2112 and 960; see below. Alternatively you can try to ensure your MP3 encoder generates at least 1152 samples of pre-roll and post-roll. See issue #3
We'll get into the details of why below, but for now lets start with a demonstration. Below is the first thirty seconds of the excellent Sintel chopped into five separate MP3 files and reassembled using MSE. The red lines indicate gaps introduced during the creation (encoding) of each MP3; you'll hear glitches at these points.
Yuck! That's not a great experience; we can do better. With a little more work, using the exact same MP3 files in the above demo, we can use MSE to remove those annoying gaps. The green lines in the next demo indicate where the files have been joined and the gaps removed. On Chrome 38+ this will playback seamlessly!
There are a variety of ways to create gapless content. For the purposes of this demo, we'll focus on the type of files a normal user might have lying around. Where each file has been encoded separately without regard for the audio segments before or after it.
Basic Setup
First, lets backtrack and cover the basic setup of a MediaSource instance. Media Source Extensions, as the name implies, are just extensions to the existing media elements. Below, we're assigning an Object URL, representing our MediaSource instance, to the source attribute of an audio element; just like you would set a standard URL.
var audio = document.createElement('audio');
var mediaSource = new MediaSource();
var SEGMENTS = 5;

mediaSource.addEventListener('sourceopen', function() {
  var sourceBuffer = mediaSource.addSourceBuffer('audio/mpeg');

  function onAudioLoaded(data, index) {
    // Append the ArrayBuffer data into our new SourceBuffer.
    sourceBuffer.appendBuffer(data);
  }

  // Retrieve an audio segment via XHR.  For simplicity, we're retrieving the
  // entire segment at once, but we could also retrieve it in chunks and append
  // each chunk separately.  MSE will take care of assembling the pieces.
  GET('sintel/sintel_0.mp3', function(data) { onAudioLoaded(data, 0); } );
}, false);

audio.src = window.URL.createObjectURL(mediaSource);
Once the MediaSource object is connected, it will perform some initialization and eventually fire a "sourceopen" event; at which point we can create a SourceBuffer. In the example above, we're creating an "audio/mpeg" one, which is able to parse and decode our MP3 segments; there are several other types available.
Anomalous Waveforms
We'll come back to the code in a moment, but lets now look more closely at the file we've just appended, specifically at the end of it. Below, is a graph of the last 3000 samples averaged across both channels from the sintel_0.mp3 track. Each pixel on the red line is a floating point sample in the range of [-1.0, 1.0].
End of sintel_0.mp3
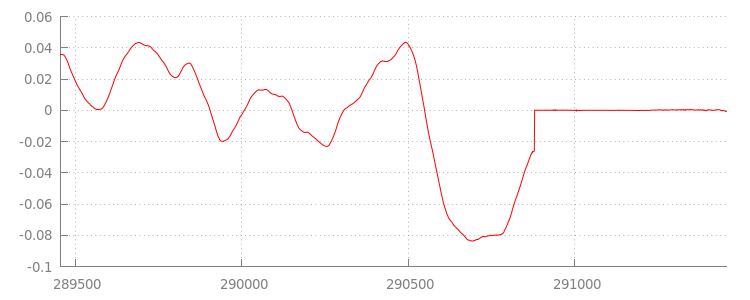
What's with all that those zero (silent) samples!? They're actually due to compression artifacts introduced during encoding. Almost every encoder introduces some type of padding. In this case LAME added exactly 576 padding samples to the end of the file.
In addition to the padding at the end, each file also had padding added to the beginning. If we peek ahead at the sintel_1.mp3 track we'll see another 576 samples of padding exists at the front. The amount of padding varies by encoder and content, but we know the exact values based on metadata included within each file.
Beginning of sintel_1.mp3
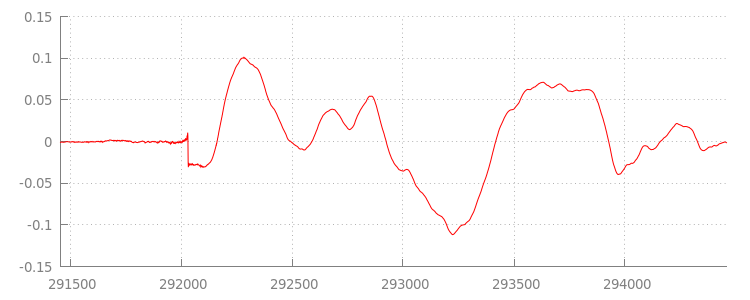
The sections of silence at the beginning and end of each file are what causes the "glitches" between segments in the previous demo. To achieve gapless playback, we need to remove these sections of silence. Luckily, this is easily done with MediaSource! Below, we'll modify our onAudioLoaded() method to use an append window and a timestamp offset to remove this silence.
Example Code
function onAudioLoaded(data, index) {
  // Parsing gapless metadata is unfortunately non trivial and a bit messy, so
  // we'll glaze over it here; see the appendix for details.  ParseGaplessData()
  // will return a dictionary with two elements:
  //
  //    audioDuration: Duration in seconds of all non-padding audio.
  //    frontPaddingDuration: Duration in seconds of the front padding.
  //
  var gaplessMetadata = ParseGaplessData(data);

  // Each appended segment must be appended relative to the next.  To avoid any
  // overlaps, we'll use the ending timestamp of the last append as the starting
  // point for our next append or zero if we haven't appended anything yet.
  var appendTime = index > 0 ? sourceBuffer.buffered.end(0) : 0;

  // Simply put, an append window allows you to trim off audio (or video) frames
  // which fall outside of a specified time range.  Here, we'll use the end of
  // our last append as the start of our append window and the end of the real
  // audio data for this segment as the end of our append window.
  sourceBuffer.appendWindowStart = appendTime;
  sourceBuffer.appendWindowEnd = appendTime + gaplessMetadata.audioDuration;

  // The timestampOffset field essentially tells MediaSource where in the media
  // timeline the data given to appendBuffer() should be placed.  I.e., if the
  // timestampOffset is 1 second, the appended data will start 1 second into
  // playback.
  //
  // MediaSource requires that the media timeline starts from time zero, so we
  // need to ensure that the data left after filtering by the append window
  // starts at time zero.  We'll do this by shifting all of the padding we want
  // to discard before our append time (and thus, before our append window).
  sourceBuffer.timestampOffset =
      appendTime - gaplessMetadata.frontPaddingDuration;

  // When appendBuffer() completes, it will fire an "updateend" event signaling
  // that it's okay to append another segment of media.  Here, we'll chain the
  // append for the next segment to the completion of our current append.
  if (index == 0) {
    sourceBuffer.addEventListener('updateend', function() {
      if (++index < SEGMENTS) {
        GET('sintel/sintel_' + index + '.mp3',
            function(data) { onAudioLoaded(data, index); });
      } else {
        // We've loaded all available segments, so tell MediaSource there are no
        // more buffers which will be appended.
        mediaSource.endOfStream();
      }
    });
  }

  // appendBuffer() will now use the timestamp offset and append window settings
  // to filter and timestamp the data we're appending.
  //
  // Note: While this demo uses very little memory, more complex use cases need
  // to be careful about memory usage or garbage collection may remove ranges of
  // media in unexpected places.
  sourceBuffer.appendBuffer(data);
}
A Seamless Waveform
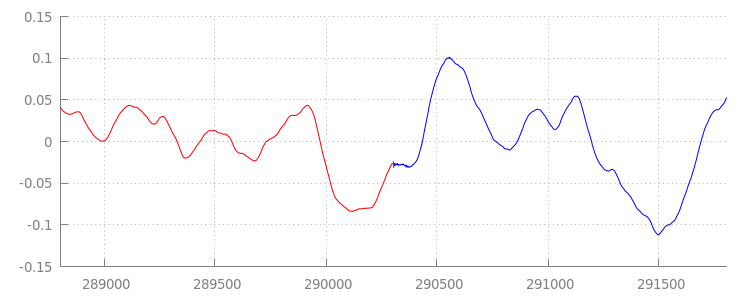
Lets see what our shiny new code has accomplished by taking another look at the waveform after we've applied our append windows. Below, you can see that the silent section at the end of sintel_0.mp3 (in red) and the silent section at the beginning of sintel_1.mp3 (in blue) have been removed; leaving us with a seamless transition between segments.
Joining of sintel_0.mp3 and sintel_1.mp3
Conclusion
With that we've stitched all five segments seamlessly into one and have subsequently reached the end of our demo. Before we go, you may have noticed that our onAudioLoaded() method has no consideration for containers or codecs... Which means all of these techniques will work irrespective of the container or codec type; below you can replay the original demo DASH-ready fragmented MP4 instead of MP3.
If you'd like to know more check the appendices below for a deeper look at gapless content creation and metadata parsing. You can also explore gapless.js for a closer look at the code powering this demo.
Thanks for reading!
Appendix A: Creating Gapless Content
Creating gapless content can be hard to get right. Below we'll walk through how the Sintel media used in this demo were created. To start you'll need a copy of the lossless FLAC soundtrack for Sintel; for posterity, the SHA1 is included below. For tools, you'll need FFmpeg, MP4Box, LAME, and an OSX installation with afconvert.unzip Jan_Morgenstern-Sintel-FLAC.zip sha1sum 1-Snow_Fight.flac # 0535ca207ccba70d538f7324916a3f1a3d550194 1-Snow_Fight.flac
First, we'll split out the first 31.5 seconds the 1-Snow_Fight.flac track. We also want to add a 2.5 second fade out starting at 28 seconds in to avoid any clicks once playback finishes. Using the FFmpeg command line below we can accomplish all of this and put the results in sintel.flac.
ffmpeg -i 1-Snow_Fight.flac -t 31.5 -af "afade=t=out:st=28:d=2.5" sintel.flac
Next, we'll split the file into 5 wave files of 6.5 seconds each; it's easiest to use wave since almost every encoder supports ingestion of it. Again, we can do this precisely with FFmpeg, after which we'll have: sintel_0.wav, sintel_1.wav, sintel_2.wav, sintel_3.wav, and sintel_4.wav.
ffmpeg -i sintel.flac -acodec pcm_f32le -map 0 -f segment \
       -segment_list out.list -segment_time 6.5 sintel_%d.wav
Next, lets create the MP3 files. LAME has several options for creating gapless content. If you're in control of the content you might consider using --nogap with a batch encoding of all files to avoid padding between segments altogether. For the purposes of this demo though, we want that padding so we'll use a standard high quality VBR encoding of the wave files.
lame -V=2 sintel_0.wav sintel_0.mp3
lame -V=2 sintel_1.wav sintel_1.mp3
lame -V=2 sintel_2.wav sintel_2.mp3
lame -V=2 sintel_3.wav sintel_3.mp3
lame -V=2 sintel_4.wav sintel_4.mp3
That's all that's necessary to create the MP3 files. Now lets cover the creation of the fragmented MP4 files. We'll follow Apple's directions for creating media which is mastered for iTunes. Below, we'll convert the wave files into intermediate CAF files, per the instructions, before encoding them as AAC in an MP4 container using the recommended parameters.
afconvert sintel_0.wav sintel_0_intermediate.caf -d 0 -f caff \
          --soundcheck-generate
afconvert sintel_1.wav sintel_1_intermediate.caf -d 0 -f caff \
          --soundcheck-generate
afconvert sintel_2.wav sintel_2_intermediate.caf -d 0 -f caff \
          --soundcheck-generate
afconvert sintel_3.wav sintel_3_intermediate.caf -d 0 -f caff \
          --soundcheck-generate
afconvert sintel_4.wav sintel_4_intermediate.caf -d 0 -f caff \
          --soundcheck-generate
afconvert sintel_0_intermediate.caf -d aac -f m4af -u pgcm 2 --soundcheck-read \
          -b 256000 -q 127 -s 2 sintel_0.m4a
afconvert sintel_1_intermediate.caf -d aac -f m4af -u pgcm 2 --soundcheck-read \
          -b 256000 -q 127 -s 2 sintel_1.m4a
afconvert sintel_2_intermediate.caf -d aac -f m4af -u pgcm 2 --soundcheck-read \
          -b 256000 -q 127 -s 2 sintel_2.m4a
afconvert sintel_3_intermediate.caf -d aac -f m4af -u pgcm 2 --soundcheck-read \
          -b 256000 -q 127 -s 2 sintel_3.m4a
afconvert sintel_4_intermediate.caf -d aac -f m4af -u pgcm 2 --soundcheck-read \
          -b 256000 -q 127 -s 2 sintel_4.m4a
We now have several M4A files which we need to fragment appropriately before they can be used with MediaSource. For our purposes, we'll use a fragment size of one second. MP4Box will write out each fragmented MP4 as sintel_#_dashinit.mp4 along with an MPEG-DASH manifest (sintel_#_dash.mpd) which can be discarded.
MP4Box -dash 1000 sintel_0.m4a && mv sintel_0_dashinit.mp4 sintel_0.mp4
MP4Box -dash 1000 sintel_1.m4a && mv sintel_1_dashinit.mp4 sintel_1.mp4
MP4Box -dash 1000 sintel_2.m4a && mv sintel_2_dashinit.mp4 sintel_2.mp4
MP4Box -dash 1000 sintel_3.m4a && mv sintel_3_dashinit.mp4 sintel_3.mp4
MP4Box -dash 1000 sintel_4.m4a && mv sintel_4_dashinit.mp4 sintel_4.mp4
rm sintel_{0,1,2,3,4}_dash.mpd
That's it! We now have fragmented MP4 and MP3 files with the correct metadata necessary for gapless playback. See appendix b for more details on just what that metadata looks like.
Appendix B: Parsing Gapless Metadata
Just like creating gapless content, parsing the gapless metadata can be tricky since there's no standard method for storage. Below we'll cover how the two most common encoders, LAME and iTunes, store their gapless metadata. Lets start by setting up some helper methods and an outline for the ParseGaplessData() used above.
// Since most MP3 encoders store the gapless metadata in binary, we'll need a
// method for turning bytes into integers.  Note: This doesn't work for values
// larger than 2^30 since we'll overflow the signed integer type when shifting.
function ReadInt(buffer) {
  var result = buffer.charCodeAt(0);
  for (var i = 1; i < buffer.length; ++i) {
    result <<= 8;
    result += buffer.charCodeAt(i);
  }
  return result;
}

function ParseGaplessData(arrayBuffer) {
  // Gapless data is generally within the first 512 bytes, so limit parsing.
  var byteStr = String.fromCharCode.apply(
      null, new Uint8Array(arrayBuffer.slice(0, 512)));

  var frontPadding = 0, endPadding = 0, realSamples = 0;

  // ... we'll fill this in as we go below.
We'll cover Apple's iTunes metadata format first since it's the easiest to parse and explain. Within MP3 and M4A files iTunes (and afconvert) write a short section in ASCII like so:
iTunSMPB[ 26 bytes ]0000000 00000840 000001C0 0000000000046E00
This is written inside an ID3 tag within the MP3 container and within a metadata atom inside the MP4 container. For our purposes, we can ignore the first "0000000" token. The next three tokens are the front padding, end padding, and total non-padding sample count. Dividing each of these by the sample rate of the audio gives us the duration for each.
  // iTunes encodes the gapless data as hex strings like so:
  //
  //    'iTunSMPB[ 26 bytes ]0000000 00000840 000001C0 0000000000046E00'
  //    'iTunSMPB[ 26 bytes ]####### frontpad  endpad    real samples'
  //
  // The approach here elides the complexity of actually parsing MP4 atoms. It
  // may not work for all files without some tweaks.
  var iTunesDataIndex = byteStr.indexOf('iTunSMPB');
  if (iTunesDataIndex != -1) {
    var frontPaddingIndex = iTunesDataIndex + 34;
    frontPadding = parseInt(byteStr.substr(frontPaddingIndex, 8), 16);

    var endPaddingIndex = frontPaddingIndex + 9;
    endPadding = parseInt(byteStr.substr(endPaddingIndex, 8), 16);

    var sampleCountIndex = endPaddingIndex + 9;
    realSamples = parseInt(byteStr.substr(sampleCountIndex, 16), 16);
  }
On the flip side, most open source MP3 encoders will store the gapless metadata within a special Xing header placed inside of a silent MPEG frame (it's silent so decoders which don't understand the Xing header will simply play silence). Sadly this tag is not always present and has a number of optional fields. For the purposes of this demo, we have control over the media, but in practice some additional sanity checks will be required to know when gapless metadata is actually available.
First we'll parse the total sample count. For simplicity we'll read this from the Xing header, but it could be constructed from the normal MPEG audio header. Xing headers can be marked by either a 'Xing' or 'Info' tag. Exactly 4 bytes after this tag there are 32-bits representing the total number of frames in the file; multiplying this value by the number of samples per frame will give us the total samples in the file.
  // Xing padding is encoded as 24bits within the header.  Note: This code will
  // only work for Layer3 Version 1 and Layer2 MP3 files with XING frame counts
  // and gapless information.  See the following document for more details:
  // http://www.codeproject.com/Articles/8295/MPEG-Audio-Frame-Header
  var xingDataIndex = byteStr.indexOf('Xing');
  if (xingDataIndex == -1) xingDataIndex = byteStr.indexOf('Info');
  if (xingDataIndex != -1) {
    // See section 2.3.1 in the link above for the specifics on parsing the Xing
    // frame count.
    var frameCountIndex = xingDataIndex + 8;
    var frameCount = ReadInt(byteStr.substr(frameCountIndex, 4));

    // For Layer3 Version 1 and Layer2 there are 1152 samples per frame.  See
    // section 2.1.5 in the link above for more details.
    var paddedSamples = frameCount * 1152;

    // ... we'll cover this below.
Now that we have the total number of samples we can move on to reading out the number of padding samples. Depending on your encoder this may be written under a 'LAME' or 'Lavf' tag nested in the Xing header. Exactly 17 bytes after this header there are 3 bytes representing the front and end padding in 12-bits each respectively.
    xingDataIndex = byteStr.indexOf('LAME');
    if (xingDataIndex == -1) xingDataIndex = byteStr.indexOf('Lavf');
    if (xingDataIndex != -1) {
      // See http://gabriel.mp3-tech.org/mp3infotag.html#delays for details of
      // how this information is encoded and parsed.
      var gaplessDataIndex = xingDataIndex + 21;
      var gaplessBits = ReadInt(byteStr.substr(gaplessDataIndex, 3));

      // Upper 12 bits are the front padding, lower are the end padding.
      frontPadding = gaplessBits >> 12;
      endPadding = gaplessBits & 0xFFF;
    }

    realSamples = paddedSamples - (frontPadding + endPadding);
  }

  return {
    audioDuration: realSamples * SECONDS_PER_SAMPLE,
    frontPaddingDuration: frontPadding * SECONDS_PER_SAMPLE
  };
}
With that we have a complete function for parsing the vast majority of gapless content out there. Edge cases certainly abound though, so caution is recommended before using similar code in production.
Appendix C: On Garbage Collection
Memory belonging to SourceBuffers is actively garbage collected according to content type, platform specific limits, and the current play position. In Chrome, memory will first be reclaimed from already played buffers. However, if memory usage exceeds platform specific limits, it will remove memory from unplayed buffers.
When playback reaches a gap in the timeline due to reclaimed memory it may glitch if the gap is small enough or stall completely if the gap is too large. Neither is a great user experience, so it's important to avoid appending too much data at once and to manually remove ranges from the media timeline that are no longer necessary.
Ranges can be removed via the remove() method on each SourceBuffer; which takes a [start, end] range in seconds. Similar to appendBuffer(), each remove() will fire an "updateend" event once it completes. Other removes or appends should not be issued until the event fires.
On desktop Chrome, you can keep approximately 12 megabytes of audio content and 150 megabytes of video content in memory at once. You should not rely on these values across browsers or platforms; e.g., they are most certainly not representative of mobile devices.
Garbage collection only impacts data added to SourceBuffers; there are no limits on how much data you can keep buffered in JavaScript variables. You may also reappend the same data in the same position if necessary.